
How to Use React Server Components (without a Framework)
/ 13 min read
Introduction
Its been a little over two years since the React team first introduced React Server Components (RSC), yet it feels like Next.js is currently the only framework which really supports them. Although Gatsby now let’s developers use RSC via partial hydration, this feature is still in beta. The developers behind Remix have been researching how to integrate RSC into that framework, but it’s unclear when that might happen. Meanwhile, the folks at Redwood have been working hard to incorporate them into their framework, but support for RSC there remains very experimental right now. While I haven’t had a chance to play with it yet, there is an interesting new framework named Waku which boasts support for RSC, though this project is still very young and hasn’t released a stable first version.
But can you use RSC without a framework at all? As a developer who first learned React by running create-react-app, I sometimes feel like the underlying mechanisms of these modern frameworks can be a little too opaque. Don’t get me wrong: I love the developer experience that frameworks like Next.js and Remix provide; they make it so much easier to build and deploy sophisticated web applications. But when it comes to wrapping my head around a new feature like RSC, I like to dive deep into the details and build something from scratch.
I won’t be going into much detail about what RSC are or why they’re beneficial; for that, I recommend reading James Comeau’s excellent article on the subject. To oversimplify things a bit: whereas before, React components were rendered exclusively on the client, we can now render components on the server. For more technical details on how this all works, it’s worth taking a look at the official RFC.
The code that follows is based upon the demo published by the React team alongside their announcement of RSC. This demo provides the best example for how to use RSC without a framework and consists of a simple notes application. What I’ve done here is extract the core logic behind the demo’s implementation of RSC. Whereas the official demo features over a dozen components, implements routing and caching, and uses a database on the backend; I’ve aimed to keep things as simple as possible.
We’ll start by creating a conventional client-side rendered React application. The “application” we’ll build is as minimal as it gets: a page featuring a counter button that displays how many times it’s been clicked. Once we’ve got that set up, I’ll walk you through the process of modifying the code to integrate RSC. I’ve done my best to keep this tutorial as accessbile as possible, but I’ll assume that you’re at least familiar with Node and have a relatively up-to-date version installed. I’ve created a repository on GitHub with the complete code for reference.
Create a Client-Side Rendered React Application
Let’s begin by setting up the file structure for our application. Make a react-counter directory with two subdirectories: src, which will contain the source code, and dist, from which we’ll serve the application.
$ mkdir react-counter
$ cd react-counter
$ mkdir src
$ mkdir dist
Spin Up a Server with Express
Install Express by running the following command; this will also generate a minimal package.json file for us.
$ npm install expressNow, let’s implement a basic Express server by creating a src/server.js file with the following code.
const express = require('express');
const path = require('path');

const server = express();

server.use(express.static(path.resolve(__dirname, '../dist')));

server.listen(3003, () => console.log('Running server...'));
This will serve any static assets that we put in dist. So, let’s give the server something to serve by creating a dist/index.html file with the following markup.
<!DOCTYPE html>
<html lang="en">
<head>
  <meta charset="UTF-8" />
  <meta name="viewport" content="width=device-width, initial-scale=1.0" />
  <title>React Counter</title>
  <script src="/main.js" defer></script>
</head>
<body>
</body>
</html>
Notice that this page references a main.js file; ultimately this script will be responsible for rendering our React application, but for now we’ll just use a little “hello world” script as a placeholder. Create a dist/main.js file with the following code.
console.log('Hello, world!');For convenience, add a start script that will run the server to the package.json file.
{
"scripts": {
"start": "node src/server.js"
},
"dependencies": {
"express": "…"
}
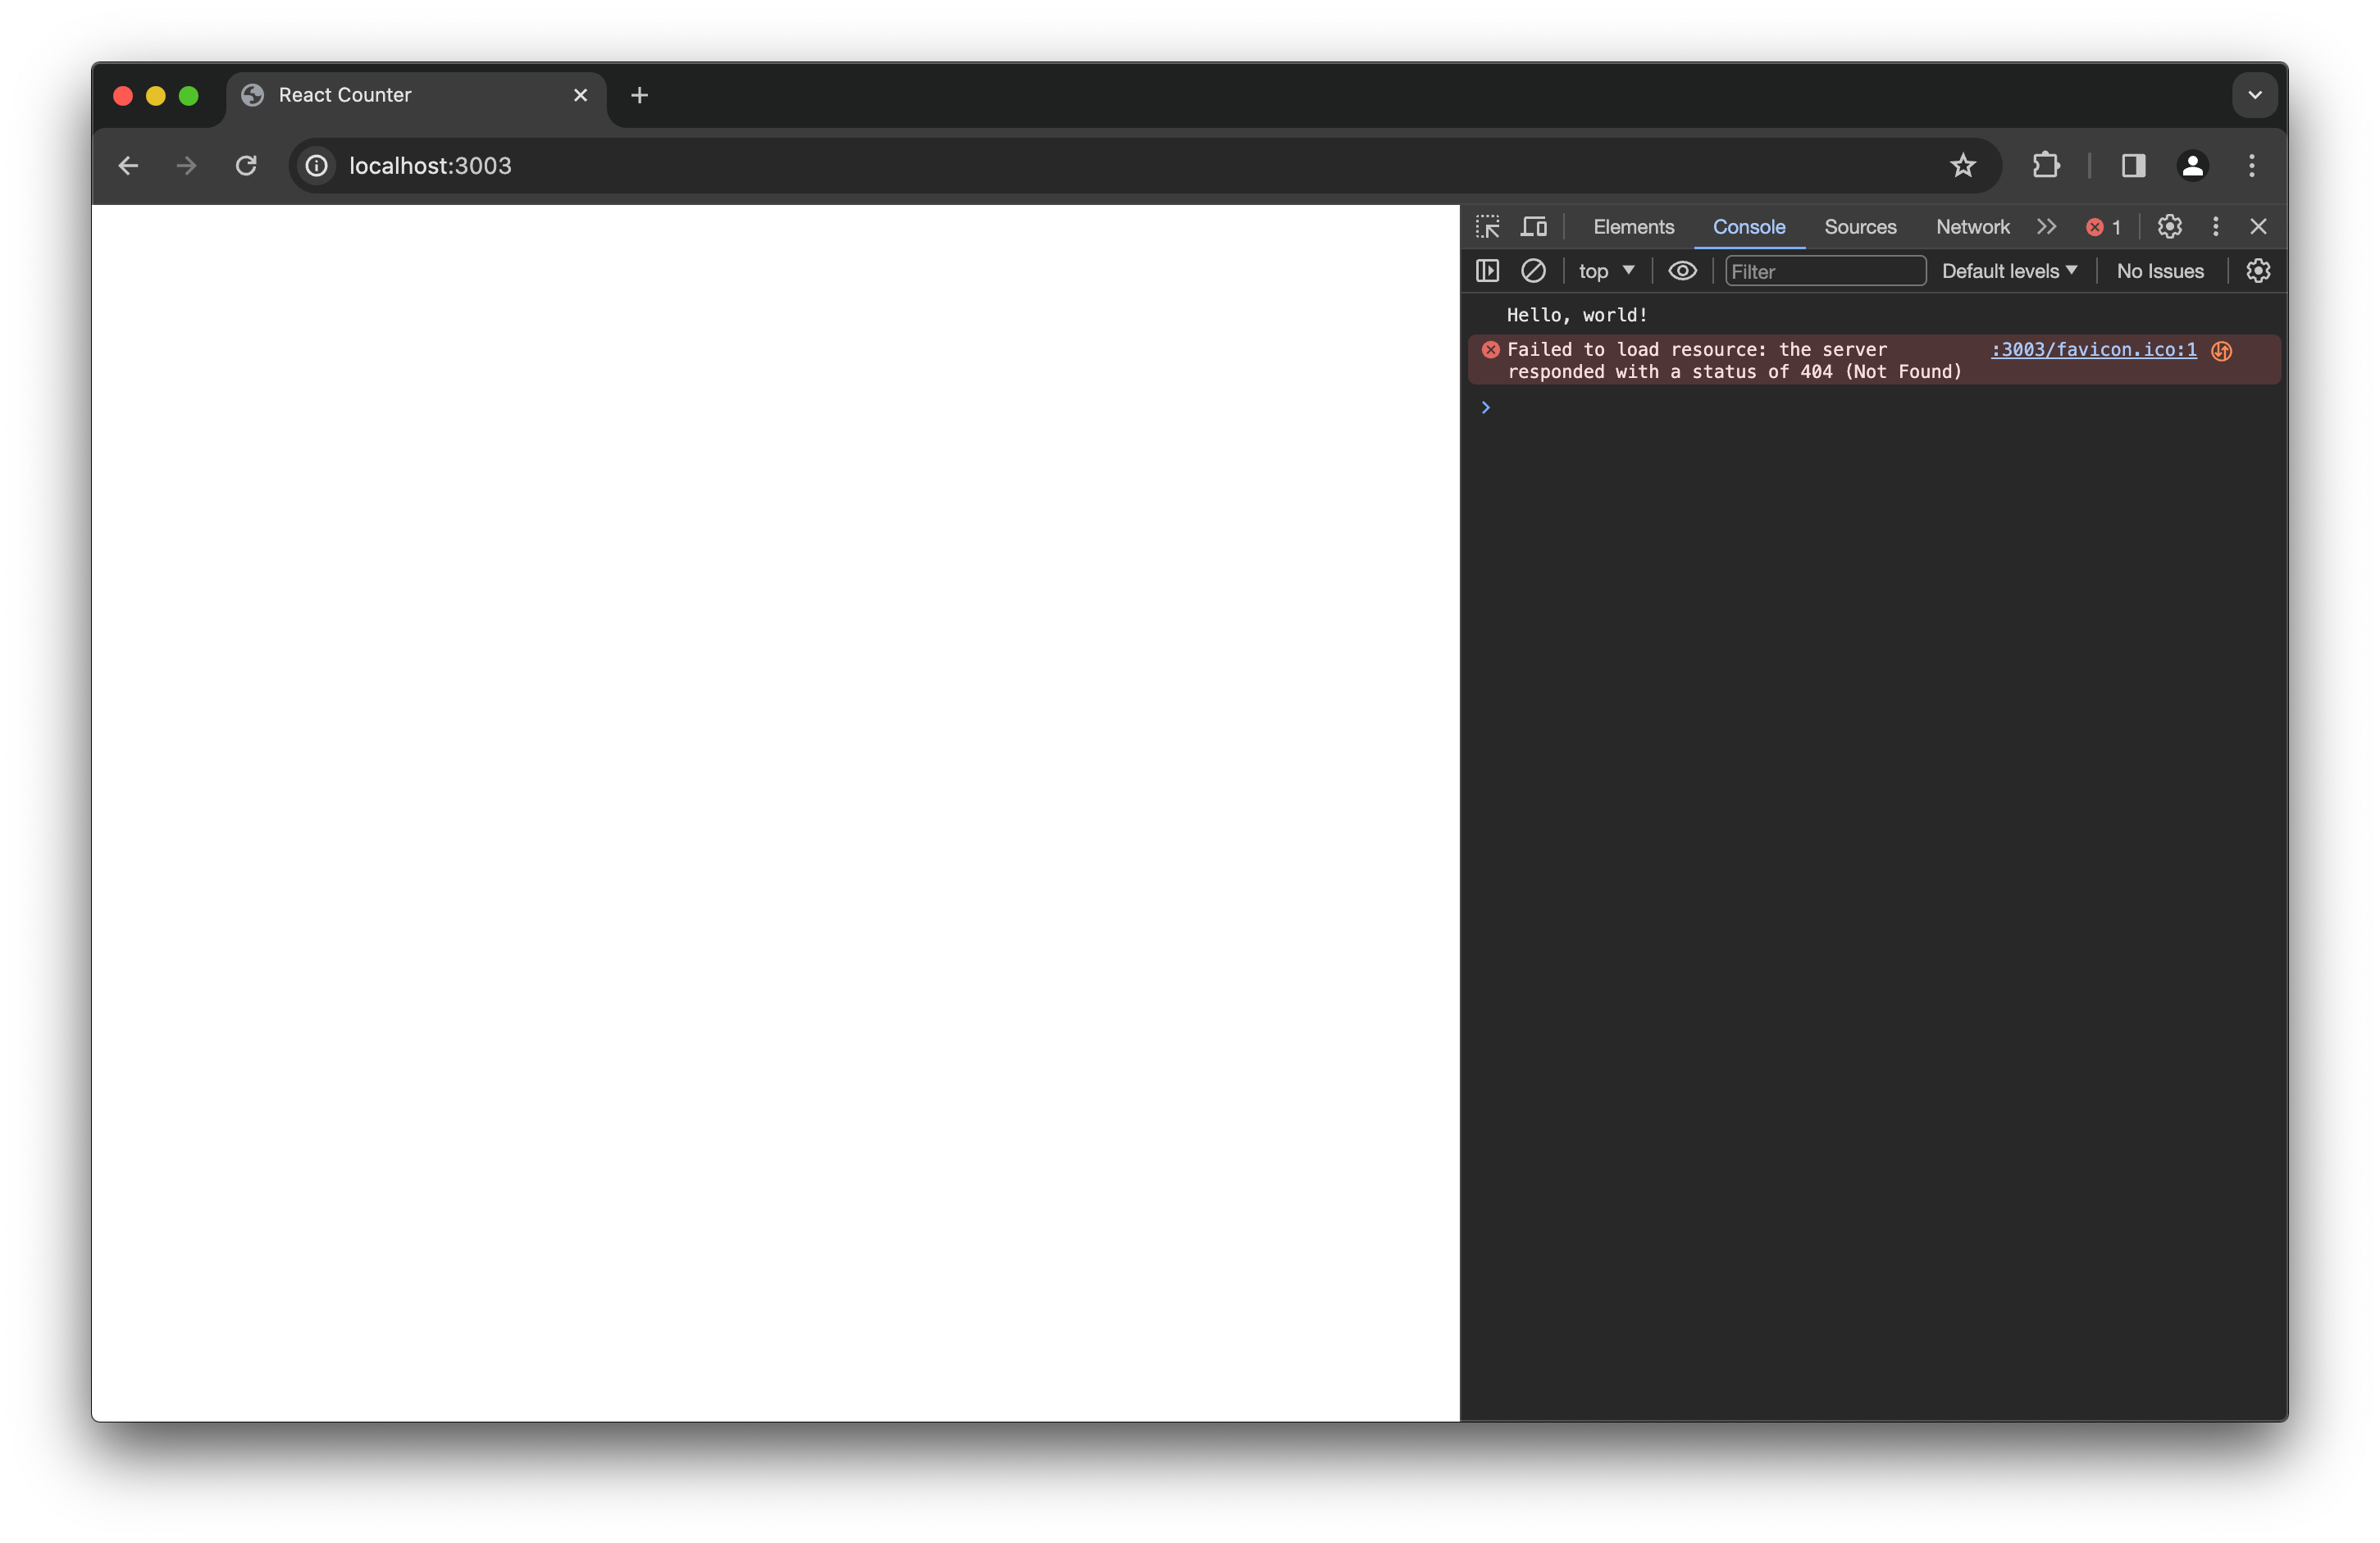
}We can test out the server by running npm start and opening a browser tab at localhost:3003. You should see a blank page and the Hello, world! message logged in your browser’s JavaScript console.
Go ahead and stop the server for now.
Write a Couple of React Components
Let’s turn that blank page into a React application. We’ll write two components: App, which will be rendered at the root of the application, and Counter, which will be a child of App that renders the counter button. First, install React and make a src/components directory to contain the components.
$ npm install --save-exact react@canary react-dom@canary
$ mkdir src/components
Because RSC require features that aren’t yet available in stable releases, we’ll have to install React packages from the canary release. We’re using --save-exact to pin the version since the canary releases don’t follow semantic versioning.
Next, we’ll write the App component. Create a src/components/App.jsx file with the following code.
import Counter from './Counter.jsx';

export default function App() {
  console.log('Rendering App component');

  return (
    <>
      <h1>A Simple Counter</h1>
      <p>
        The button below displays the number
        of times it has been clicked.
      </p>
      <Counter />
    </>
  );
}
Then, write the Counter component by creating a src/components/Counter.jsx file with the following code.
import { useState } from 'react';

export default function Counter() {
  console.log('Rendering Counter component');

  const [count, setCount] = useState(0);

  return (
    <button onClick={ () => setCount(count + 1) }>
      { count }
    </button>
  );
}
Now that we have a couple of React components, we need to write some code to actually render them on the client. Create a src/client.js file with the following code.
import { createRoot } from 'react-dom/client';
import { createElement } from 'react';

import App from './components/App.jsx';

createRoot(document.body).render(createElement(App));
This code will turn the body element of the index.html page into a root where React will render the App component.
Bundle with Webpack
The placeholder script in dist/main.js will be replaced by the code we just wrote in src/client.js; but because this code depends on other code (from the react and react-dom packages as well as our components), we need to pack all that code together into one big bundle for it to run in the browser. We’ll also need to compile the JSX code in our components into plain JavaScript that the browser can understand. We’ll use Webpack to build the client bundle and Babel to compile the JSX code.
$ npm install webpack webpack-cli
$ npm install @babel/core @babel/preset-react babel-loader
Then, we’ll configure Webpack by creating a webpack.config.js file with the following code.
const path = require('path');

module.exports = {
  entry: './src/client.js',
  output: {
    path: path.resolve(__dirname, 'dist'),
    filename: 'main.js'
  },
  module: {
    rules: [
      {
        test: /\.jsx$/,
        use: 'babel-loader',
        exclude: /node_modules/
      }
    ]
  }
};
This configuration tells Webpack to bundle all the code needed to run src/client.js and output it to dist/main.js, using Babel to handle any .jsx files it needs.
Next, we’ll add a build script that runs Webpack to the package.json file. We also need to add a babel entry to configure Babel.
{
"scripts": {
"build": "webpack",
"start": "node src/server.js"
},
"babel": {
"presets": [
[
"@babel/preset-react",
{
"runtime": "automatic"
}
]
]
},
"dependencies": {
"@babel/core": "…",
"@babel/preset-react": "…",
"babel-loader": "…",
"express": "…",
"react": "…",
"react-dom": "…",
"webpack": "…",
"webpack-cli": "…",
}
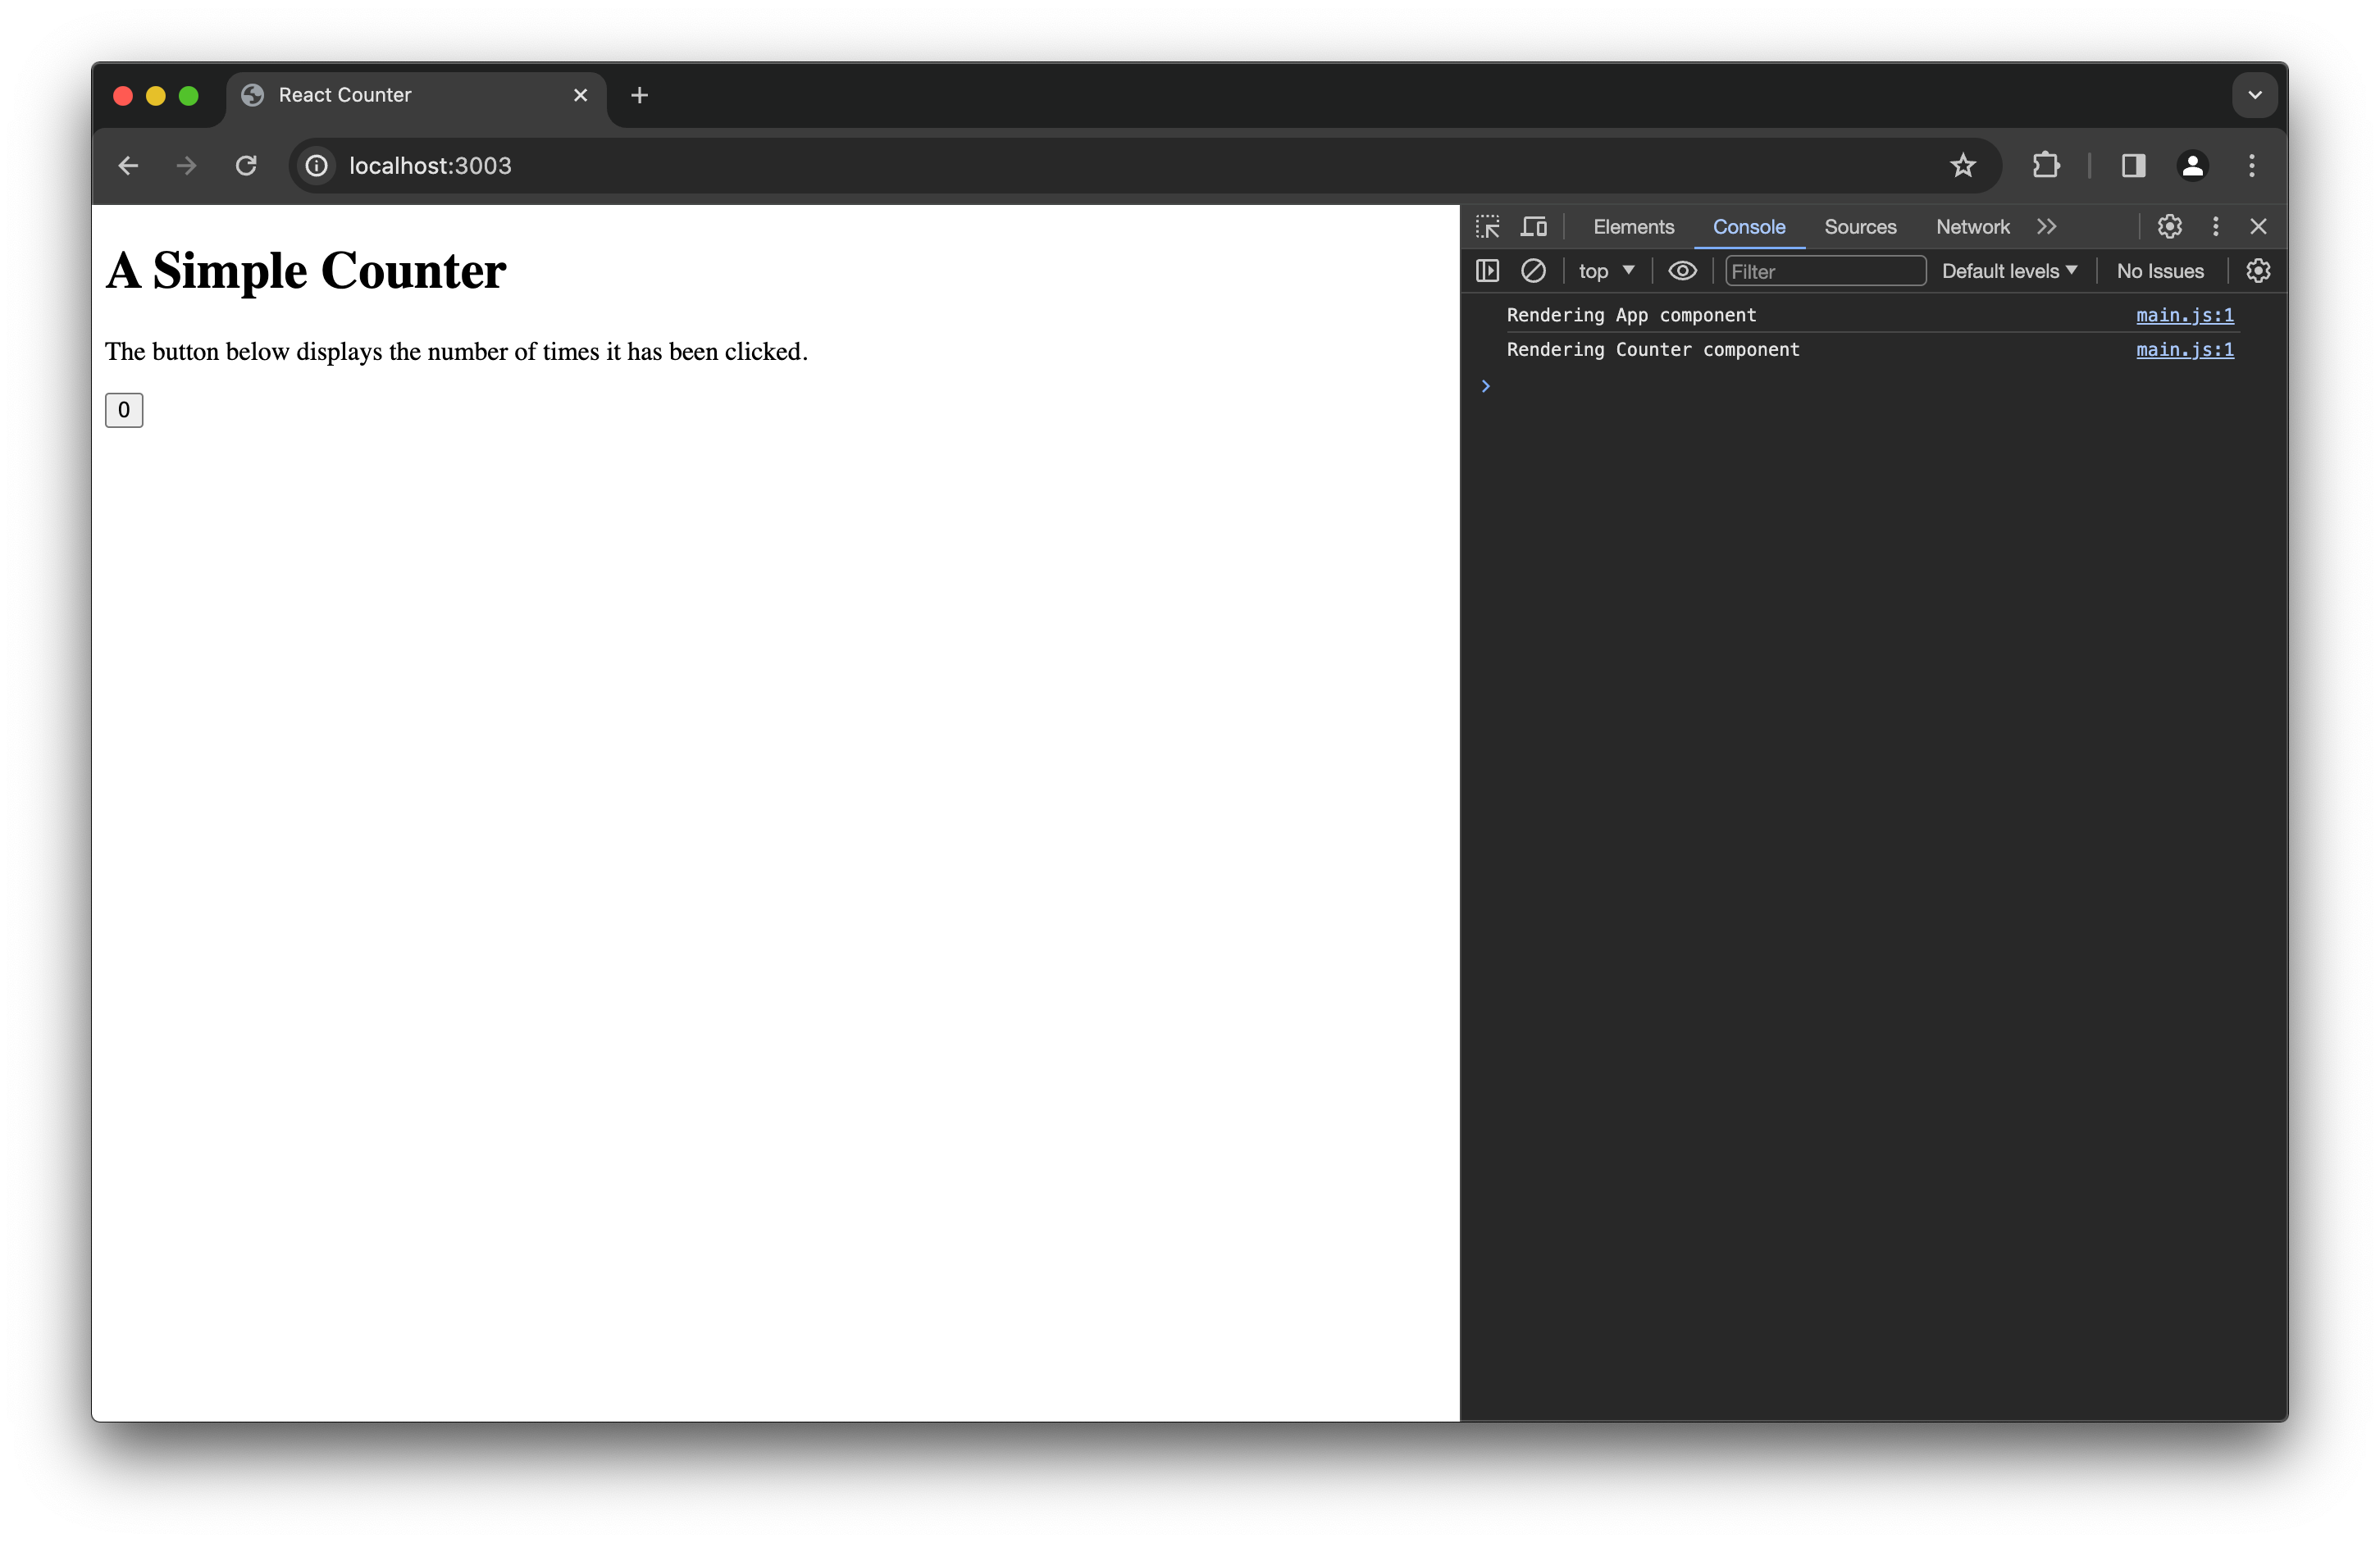
}Now, run npm run build and give Webpack a moment to do its thing; once it finishes, open up dist/main.js and you should see the bundle it produced—a bunch of cryptic JavaScript. If you run npm start again and refresh your browser tab, you should see that React rendered the application. Take a look at your browser’s JavaScript console and you’ll see the two messages logged by the components when they rendered.
Stop the server again before continuing.
Modify the Application to Integrate RSC
Now that we have a simple React application rendering on the client, let’s see how we can leverage RSC to move (some of) the rendering process to the server. Notice how the Counter component is interactive and relies on the useState hook; in the new React paradigm, this should be a client component. Whereas Counter should continue to render on the client, the App component itself is not interactive and could be rendered on the server as a server component. To use RSC, we need to install a special package first.
$ npm install --save-exact react-server-dom-webpack@canaryAlthough you won’t find any reference to it in the React documentation, this package is actively developed by the React team and holds the “secret sauce” needed to incorporate RSC in our application. It might seem a little odd that Webpack appears in the package’s name, but this is because RSC require integration with a bundler.
Modify the Client Code
Before continuing, let’s add the use client directive to the top of the src/components/Counter.jsx file to mark Counter as a client component.
'use client';

import { useState } from 'react';

export default function Counter() {
  console.log('Rendering Counter component');

  const [count, setCount] = useState(0);

  return (
    <button onClick={ () => setCount(count + 1) }>
      { count }
    </button>
  );
}
We won’t have to modify the code for App since React will treat it as server component by default. But we will have to modify our client entry point; so, go ahead and replace the code in src/client.js with the following.
import { createRoot } from 'react-dom/client';
import { createFromFetch } from 'react-server-dom-webpack/client';

createRoot(document.documentElement).render(await createFromFetch(fetch('/react')));
Now, instead of importing the App component and passing it to createElement, we’re fetching some data from a /react endpoint on the server and passing it to createFromFetch. The server will render the App component and send the resulting data in response (along with the information that the client needs to render Counter). We’ll see how to implement this endpoint in a moment, but let’s tweak our Webpack configuration a bit first.
Modify the Webpack Configuration
As I mentioned above, RSC require integration with a bundler. The react-server-dom-webpack package provides a Webpack plugin that we’ll need to add to our configuration. Go ahead and modify webpack.config.js like so.
const path = require('path');
const ReactServerPlugin = require('react-server-dom-webpack/plugin');

module.exports = {
  entry: './src/client.js',
  output: {
    path: path.resolve(__dirname, 'dist'),
    filename: 'main.js'
  },
  module: {
    rules: [
      {
        test: /\.jsx$/,
        use: 'babel-loader',
        exclude: /node_modules/
      }
    ]
  },
  plugins: [
    new ReactServerPlugin({ isServer: false })
  ]
};
Now, run npm run build again with this new configuration and let’s see what Webpack outputs. In addition to main.js, you should now see another JavaScript file and a couple of JSON files sitting in dist. What’s going on here?
Well, one of the benefits that RSC confer is automatic code splitting. Now, instead of one big bundle containing the entire React application, the code is split into multiple bundles. This additional JavaScript file actually contains the code for Counter; because we declared it to be a client component, it was split off into its own bundle. The JSON files generated by this new Webpack configuration help React keep track of the bundles it produced; for our purposes, we’ll only need one of them—the react-client-manifest.json file.
Modify the Server Code
The only thing left to do is implement the /react endpoint that our client code needs, but we’ll have to install two more packages in order to translate our components’ code into a form that can be used by our server.
$ npm install @babel/register @babel/plugin-transform-modules-commonjsWe’ve already seen how to configure Webpack to use Babel in order to compile JSX and build our client bundle, but we’ll also have to use Babel to compile JSX for our server code as well. The @babel/register package exports a function that, when called, modifies Node’s require function to pass imports through Babel. Note that our components are written as ES modules, whereas our server is a CommonJS module. The @babel/plugin-transform-modules-commonjs package enables Babel to transform ES modules into CommonJS modules. Using these packages, we can import our components’ code into the server.
Go ahead and replace the contents of src/server.js with the following code.
const express = require('express');
const fs = require('fs');
const path = require('path');
const { renderToPipeableStream } = require('react-server-dom-webpack/server');
const { createElement } = require('react');

const reactRegister = require('react-server-dom-webpack/node-register');
const babelRegister = require('@babel/register');

reactRegister();
babelRegister({
  ignore: [/node_modules/],
  plugins: ['@babel/transform-modules-commonjs']
});

const App = require('./components/App.jsx').default;
const manifest = JSON.parse(fs.readFileSync(path.resolve(__dirname, '../dist/react-client-manifest.json'), 'utf-8'));

const server = express();

server.use(express.static(path.resolve(__dirname, '../dist')));

server.get('/react', (_, response) => {
    const { pipe } = renderToPipeableStream(createElement(App), manifest);
    pipe(response);
});

server.listen(3003, () => console.log('Running server...'));
There’s a few changes to unpack here. Notice the babelRegister function call which allows us to import JSX and ES modules as described above; in addition, we’re also importing a reactRegister function from the react-server-dom-webpack package that works similarly. When called, reactRegister modifies require to properly import server/client components. After that, we import our App component into the server.
The most important change though is the new route handler for the /react endpoint, in which we pass App and the contents of react-client-manifest.json to a function named renderToPipeableStream. As its name suggests, this function will render App into a data format that can streamed to the client. It then returns an object containing a function named pipe, which will take our response stream and write the data to it.
There’s just one small change left to make: modify package.json to set the react-server condition when starting the server. This condition is required to properly configure React to use RSC.
{
"scripts": {
"build": "webpack",
"start": "node --conditions react-server src/server.js"
},
"babel": {
"presets": [
[
"@babel/preset-react",
{
"runtime": "automatic"
}
]
]
},
"dependencies": {
"@babel/core": "…",
"@babel/plugin-transform-modules-commonjs": "…",
"@babel/preset-react": "…",
"@babel/register": "…",
"babel-loader": "…",
"express": "…",
"react": "…",
"react-dom": "…",
"react-server-dom-webpack": "…",
"webpack": "…",
"webpack-cli": "…",
}
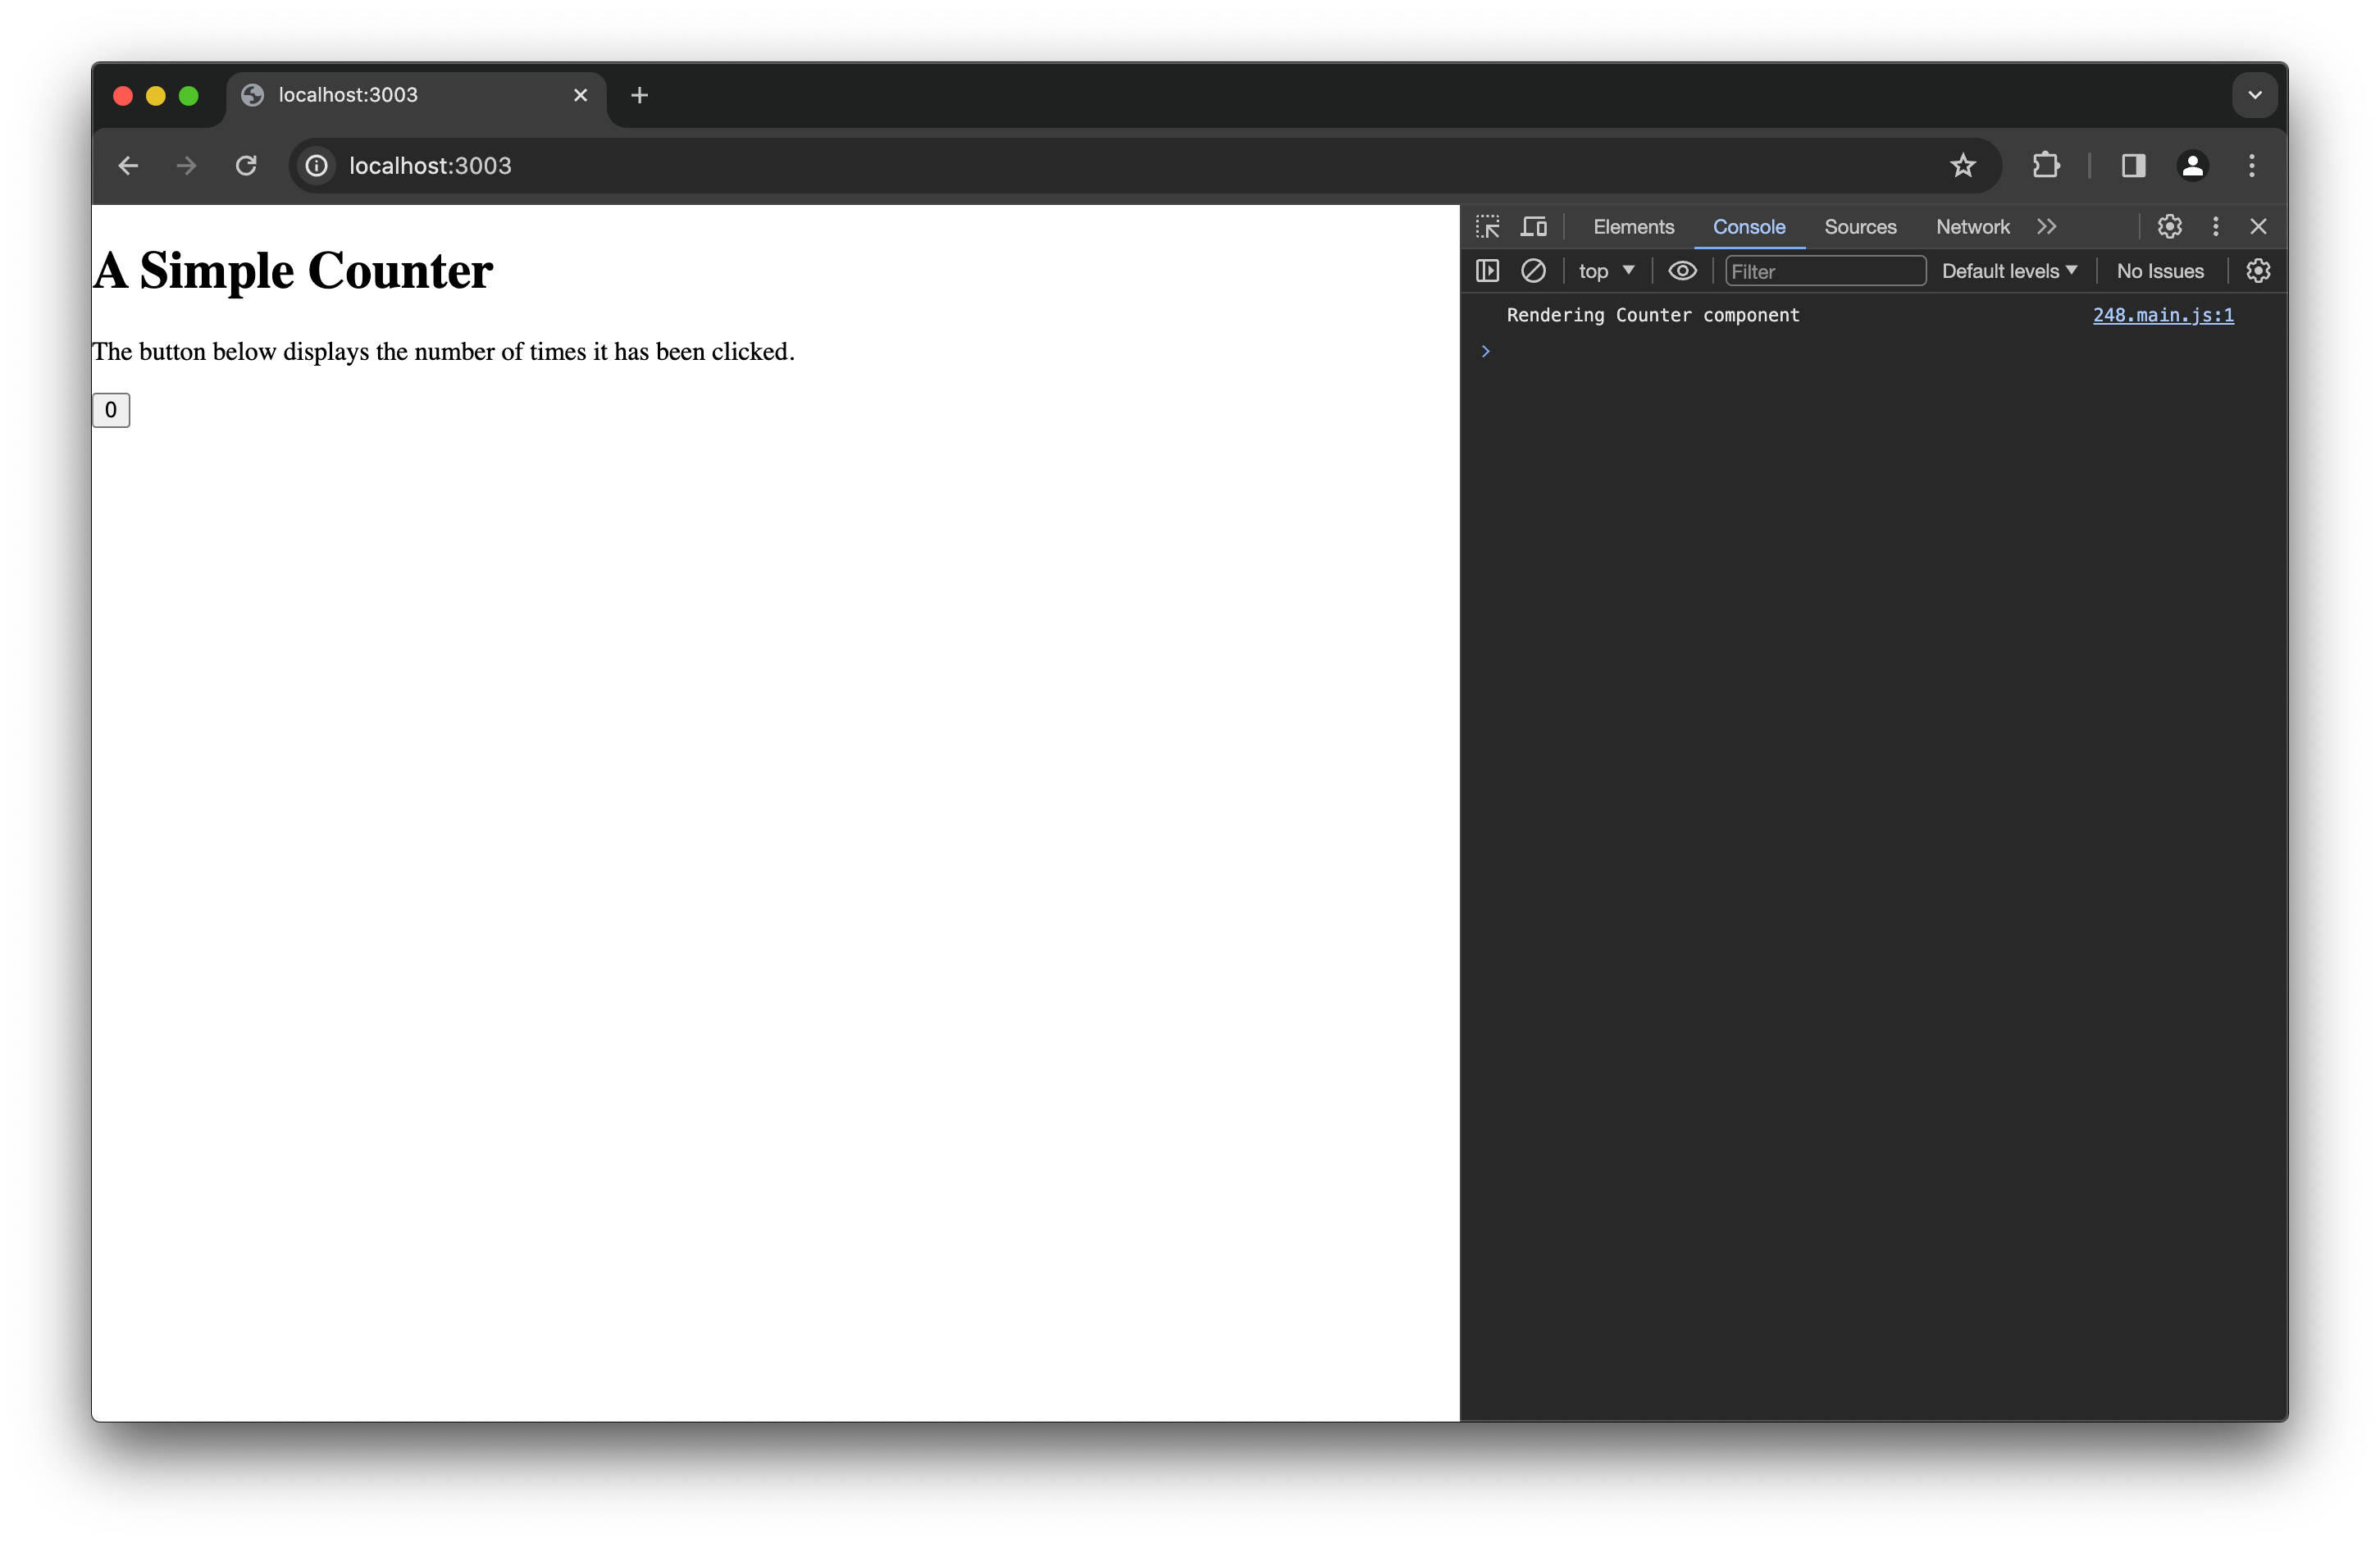
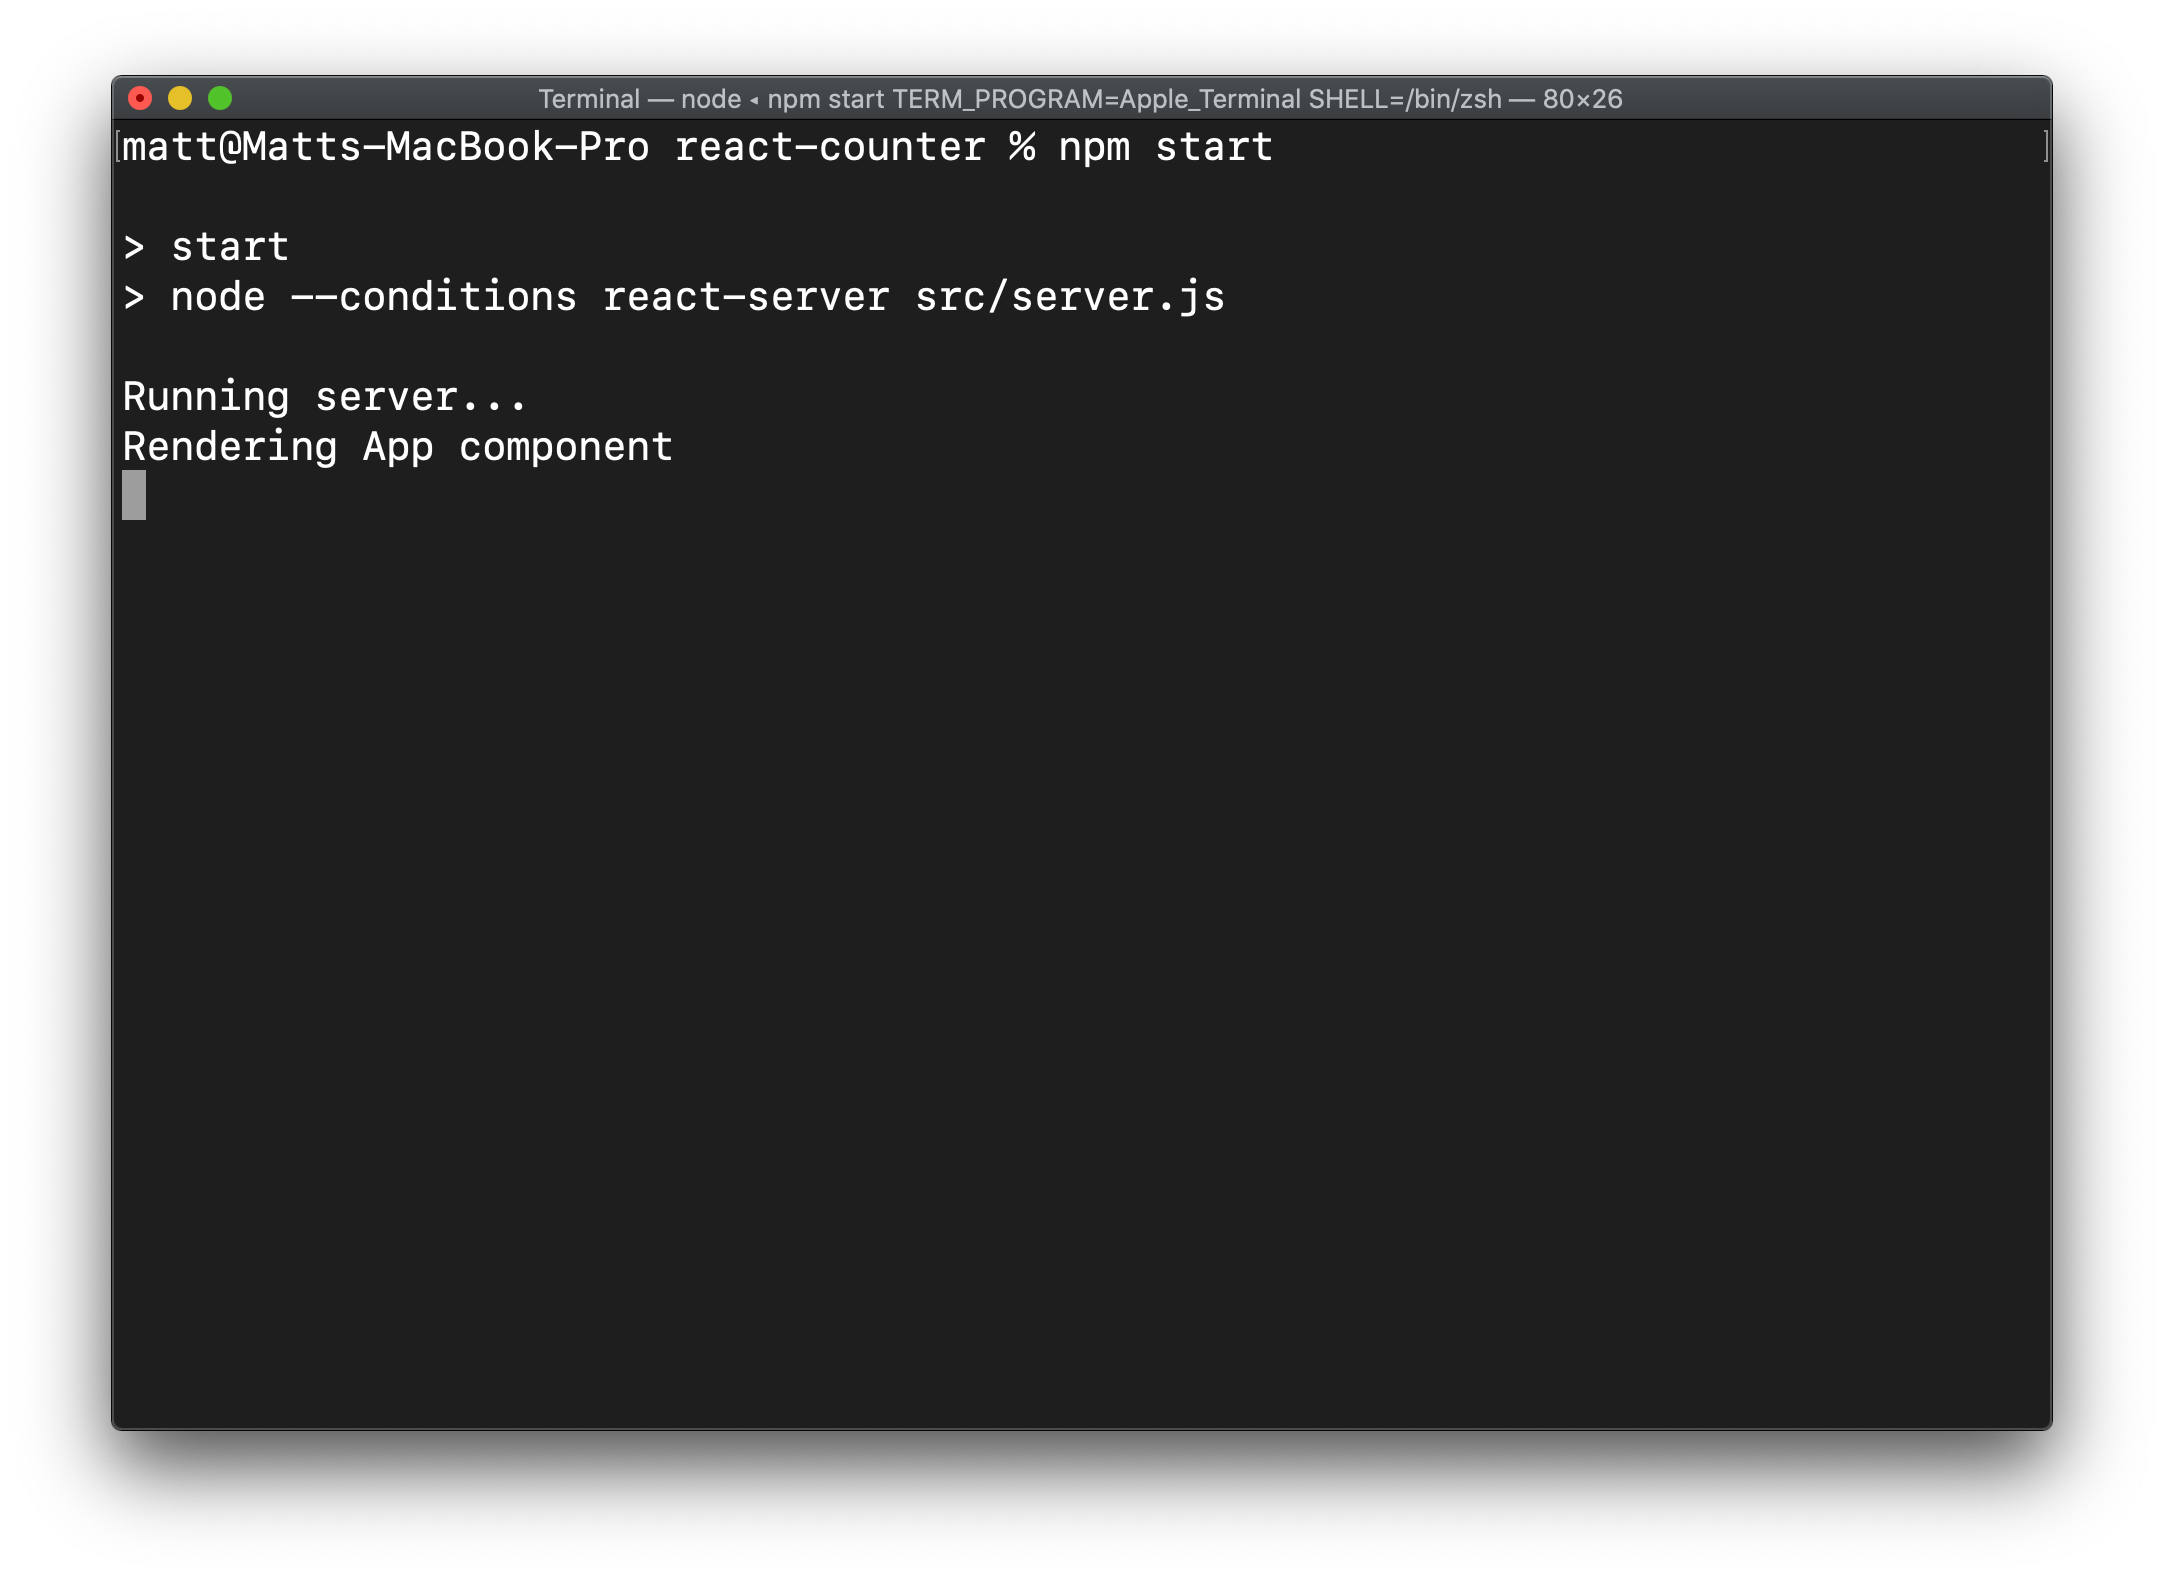
}Alright! Now, run npm start again and refresh the page. Notice how only the Rendering Counter component message is logged in your browser’s JavaScript console now. The App component now renders on the server. If you look at your terminal, you’ll see the Rendering App component appears there instead.
Conclusion
While the React application we’ve built is utterly simple and doesn’t really necessitate the complexity that RSC entail, I hope that you learned something about how they work “under the hood”. And take a moment to appreciate all that modern React frameworks do for us. Manually configuring transpilers and bundlers can be an annoying distraction from actually building our applications.
It’ll be interesting to see where the React ecosystem takes RSC going forward. Next.js provides a great developer experience around them, but it would be cool to see what Remix can do with RSC. And, hopefully, these new features will find their way into a stable release soon and we’ll get some more documentation from the React team.